Firewall-as-a-Service (FWaaS)
User Configuration Guide
Build Your Own FWaaS Experience
This walk-through provides an overview of the G-Net FWaaS Configuration section of the G-Net Service Portal.
G-Net SASE Services Platform
Hybrid Cloud or On-Premises Option
1. Introduction
Welcome to the G-Net Portal, where you can simplify security management and centrally manage and enforce security policies.
With G-Net, you can receive comprehensive security protection without the need to acquire, test, integrate, and manage a multitude of security products and services. This enables you to more easily secure your hybrid IT infrastructure, keep ahead of emerging threats, and instantly adapt to regulatory requirements.
The G-Net FWaaS platform offers:
- Comprehensive coverage: All distributed network assets, from local offices to satellite locations to mobile devices are covered by our solution.
- Consistent policy enforcement: With all assets covered within the same platform, you can easily apply company-wide security policies to enforce threat management, handle user access, and a robust set of security capabilities that takes you out of the business of having to acquire, test, integrate, and manage multiple security products and services.
- 100% visibility: The G-Net Cloud gives you complete control and total visibility of your customers’ environments and security policies. You can manage all rules at a granular level, and you can see exactly what’s happening on the network.
- Real-time updates: With the threat and regulatory landscape constantly changing, our solution is constantly updated to address new threat models to improve your overall security posture and reduce your risk exposure.
What Sets G-Net Apart?
- Comprehensive security-as-a-service delivered on a reliable, trusted secure networking backbone
- Unique IP that empowers customers to centrally enforce granular security controls
- Integrated best-of-breed security technologies deliver cost-effect, enterprise-grade protection
- Greater than 150 peering relationships enhances performance – ->60% of customer traffic never touches the Internet.
2. Requirements
Requirements
| Supported Operating Systems | Specification |
| G-Net VPN Client |
Windows workstation: 7, 8.1, 10 Windows Server: 2012, 2016, 2019 MacOS 10.11 + |
| System Utilization | Specification |
| Processor | <1% (all operating systems) |
| Disk space | Windows: 270MB / Mac: 50MB /Linux: 50MB |
| RAM | Windows: 120MB / Mac: 50MB /Linux: 50MB |
| Connection Type | Specification |
| G-Net VPN Client | UDP 1194, AES-256-GCM, SHA256 |
10 Mbps Broadband connection
3. Get Started - Login
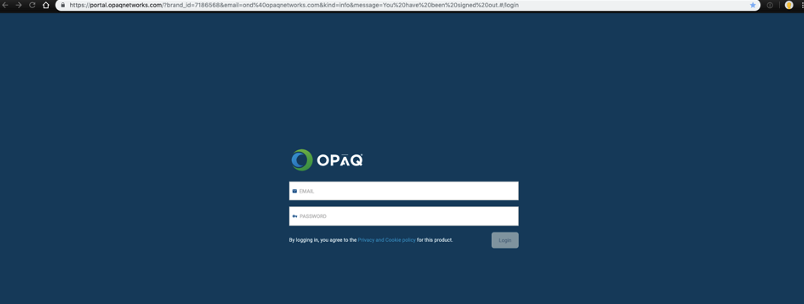
Login
Depending on configuration users can login into G-Net Cloud console using:
- Username and password
- Username and password + DUO two factor authentication

Once you’ve logged into the G-Net Cloud Console you’ll be directed to your Partner page. This page provides a summary of your customers and the status of their deployment.
- Customer List – Displays customers, product types, activation requests and the ability to configure the customers by selecting the cog icon.
- Customer Details – Displays key configuration and data elements for products used by the customer
- Request – Display the support request details made by the selected customer to include subject of the request, requester, date or last activity and status of the request.
- Sites – Displays the sites details of the selected customer, to include Site Name, connection type and region.
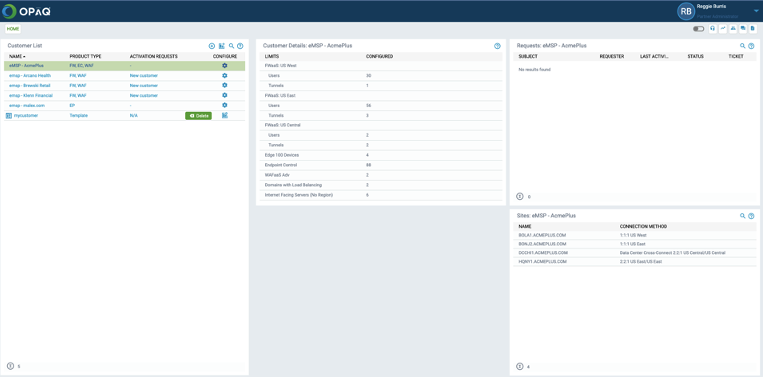
To look more closely at a particular end customer or to perform any configuration changes (Moves, Adds, Changes and Deletes (MACD)), click the cog icon under Customer list.
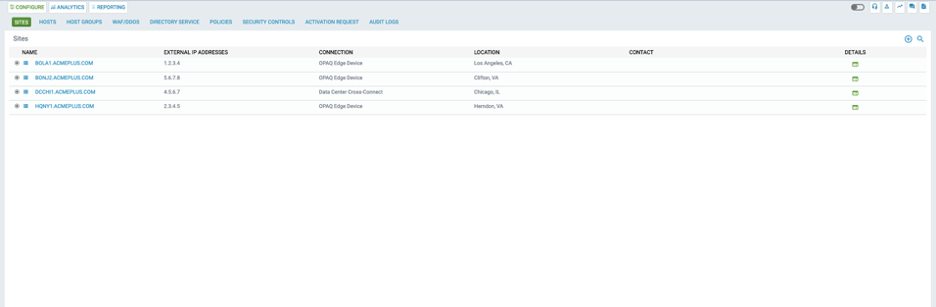
This takes you to the CONFIGURE section. In addition to configuration, there are two other important tabs that help you support each customer:
- ANALYTICS
- REPORTING
We will cover these pages in-depth in their own dedicated walk-throughs.
The rest of this guide walks you through the CONFIGURE page and its tabs.
4. User Management
User Management
First step would be for the Partner to add end customer access to the G-Net Cloud Console based if required. Access to log into G-Net Cloud Console has two level of control depending on the role granted. To modify, add, change, delete, a user, go to the User Management icon.

- Global Administrator – This role allows for full control of the customer’s G-Net deployment. This includes, troubleshooting issues with G-Net Support, requesting changes, and managing other Administrators
- Troubleshooting Administrator – This role is able to troubleshoot with G-Net Support but is not authorized to submit changes.
To add a new Administrator, click the +Add Administrator button. Provide contact information for the administrator that is being added
- The passphrase will be used for identifying the Administrator if this Administrator contacts G-Net support over the phone..
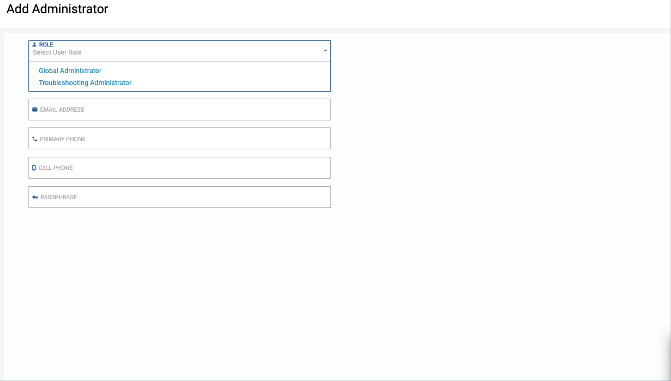
HIT “Add Administrator”
5. Sites
Sites
The first tab in CONFIGURE is SITES. This displays all the sites where there is an G-Net FWaaS deployment. It also allows you to add new sites and edit existing ones.
Clicking on one of the sites will expand the row to provide summary data for that site.
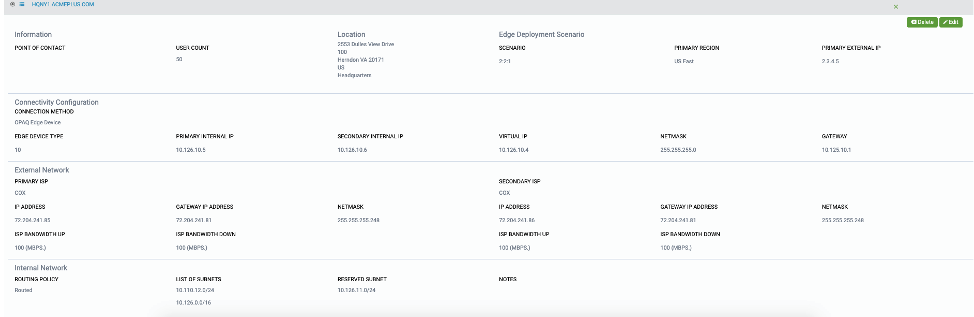
- To Add a site, click the +Add Site button
- To Delete a site, click on Delete button
- To Edit a current site, click the Edit button.
There are four tabs that needs to be configured completely, you can select the individual tabs or go to the bottom right and select SAVE/NEXT highlighted in green.
- Information
- Connectivity Configuration
- External Network
- Internal Network
Information
Provide information about the site
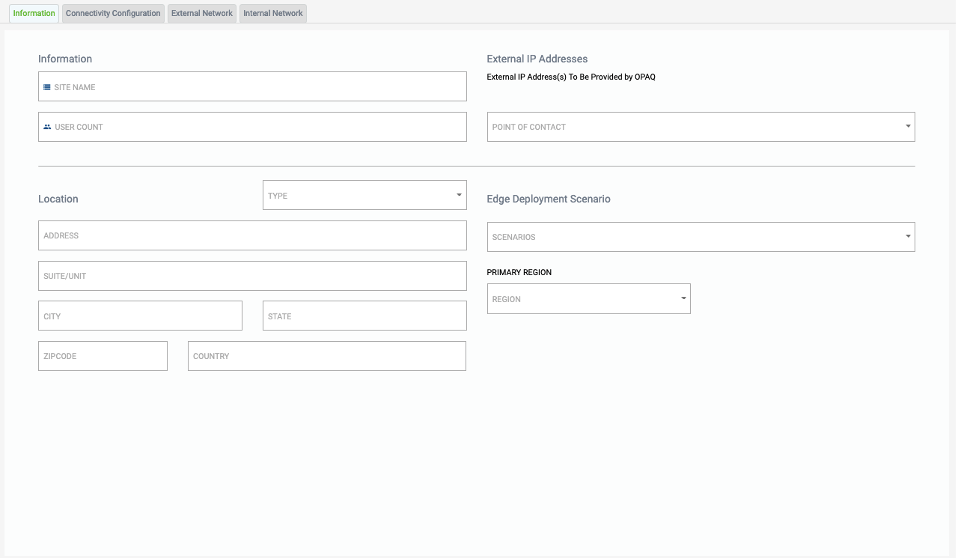
NOTE: Make sure the point of contact is already populated within the User Management section of the console
While entering information in any of the fields in the G-Net Portal, you’ll notice that there is an information bar on the right-hand side of the screen that provides tips, if you need help filling out the form.
Select location Type – Select type
- Headquarters
- Branch Office
- Vendor
- Data Center
Edge Deployment Scenario – Select edge deployment method for this site.
Primary Region – choose Region or Regions this site would be connected to.
Hit “Save or Next”
Connectivity Configuration
Select this option for connecting to G-Net’s cloud-based solution.
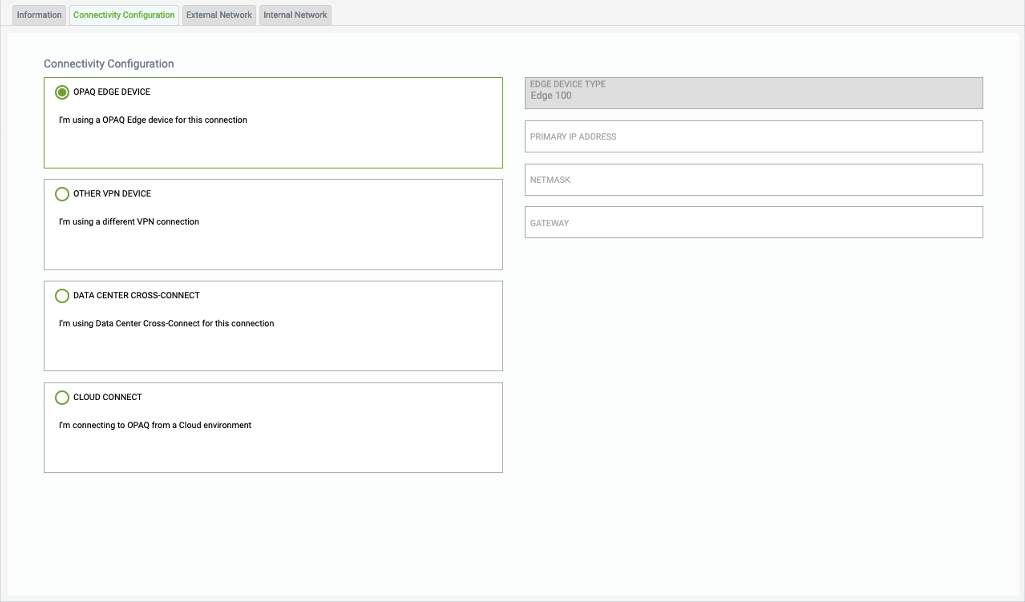
Select “G-Net EDGE DEVICE” (Highly Recommended)
Select this option if you plan to use an Edge Device from G-Net for connecting to G-Net’s cloud-based solution. Select whether you are deploying
- Edge 50 Wired
- Edge 50 Wireless
- Edge 100 device.
- Specify the Trusted IP address and Netmask you would assign to G-Net’s Device within your network.
- Specify the Trusted internal Next Hop address for any internal subnets as Gateway.
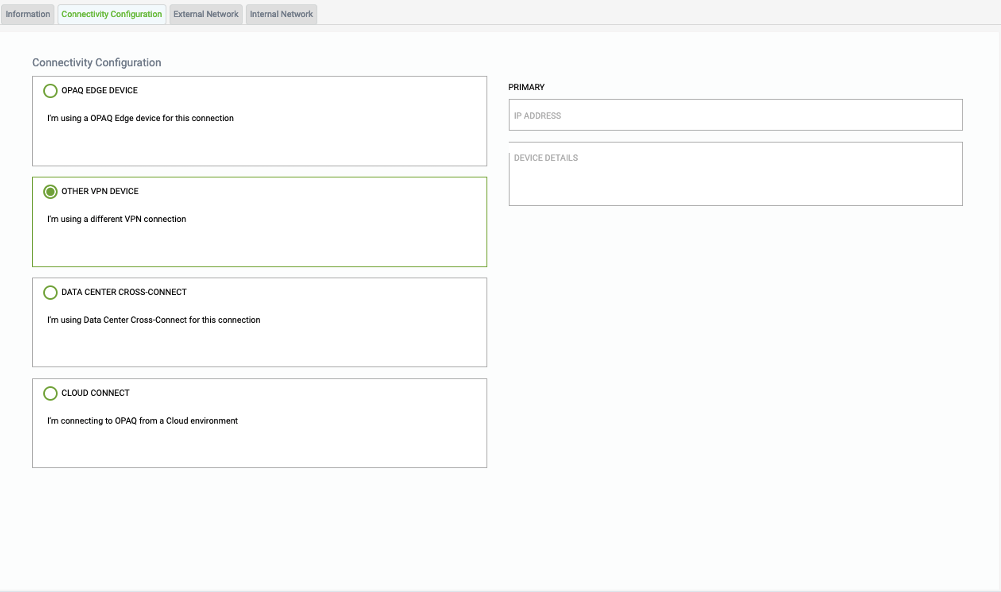
Select “OTHER VPN DEVICE”
Select this option if you plan to use your own Device from G-Net for connecting to G-Net’s cloud-based solution.
NOTE: G-Net can support 3rd party edge device as long as it meets G-Net’s validation testing requirements. Please check with your G-Net Solution Architect if you would like to ensure your device is on the validated list
- Specify the Trusted IP address you would assign to your Device within your network.
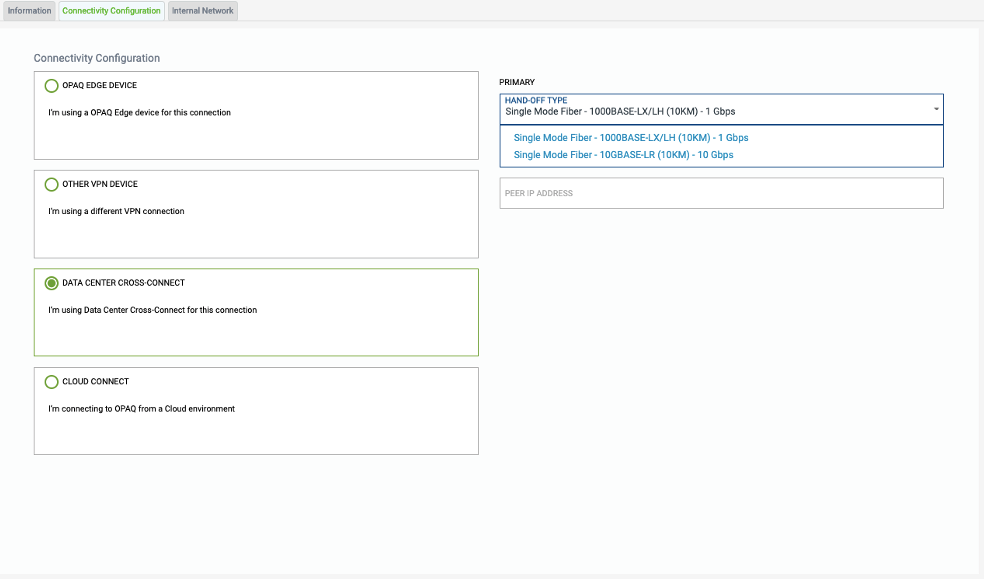
Select “DATA CENTER CROSS-CONNECT”
Select this option if you plan to setup a cross-connect from your Site within the same G-Net’s data center.
Select a supported hand-off type and provide requested bandwidth for the cross-connect.
- Single Mode Fiber – 1000Base-LX/LH (10KM) – 1 Gbps
- Single Mode Fiber – 10Base-LX/LH (10KM) – 10 Gbps
- Request Bandwidth
- Peer IP Address
Select “CLOUD CONNECT”
Select this option if you plan to connect to a Cloud based solution. Select the Cloud Provider you are using.
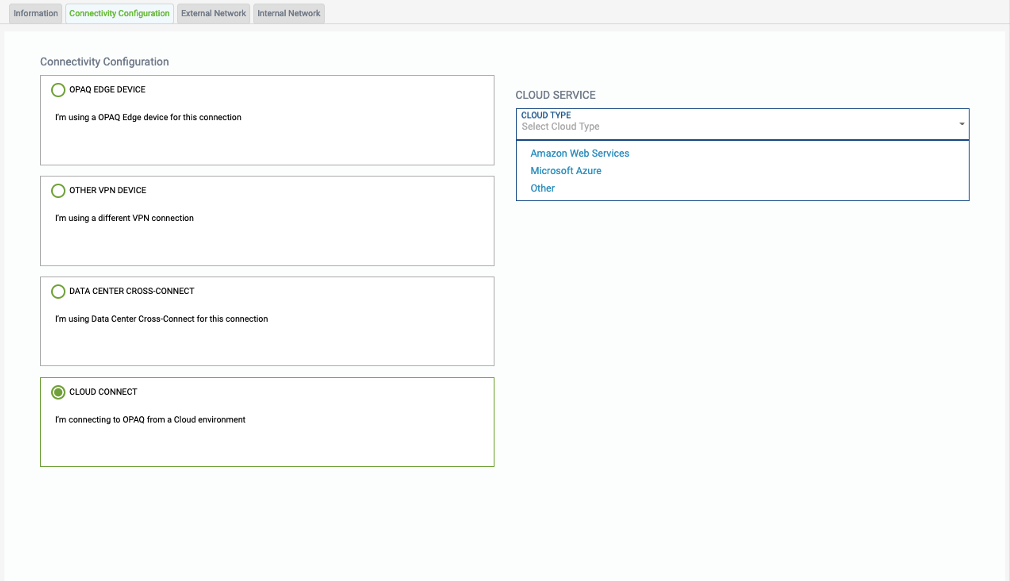
In case you are connecting with AWS, AWS supports a two tunnel based solution and would have provided you two IP addresses at AWS end for making the connection
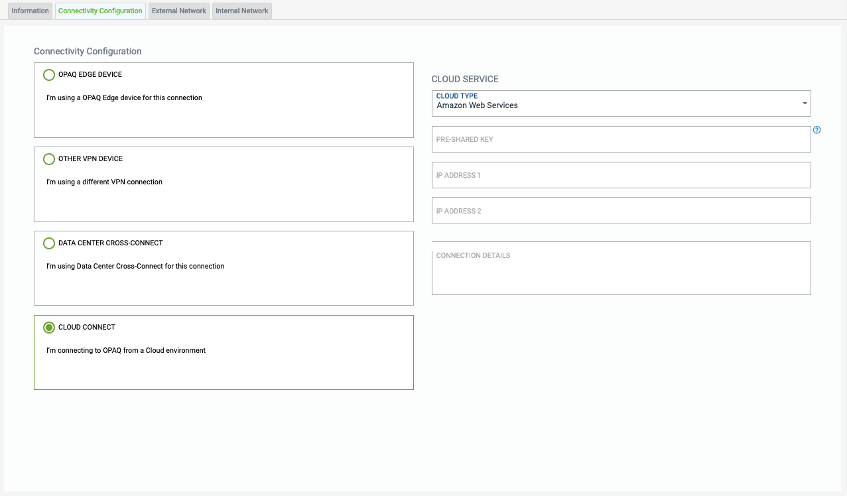
A pre-shared key (PSK) or shared secret is a string of text a VPN (virtual private network) or other service expects to get before it receives any other credentials (such as a username and password). This will have been provided to you by your cloud provider.
For connection to Azure, we would need to create tunnels between subnets at Azure (you would provide that on the last tab here) and subnets for your organization. Please provide 1-5 subnets for your organization that should have connectivity to Azure

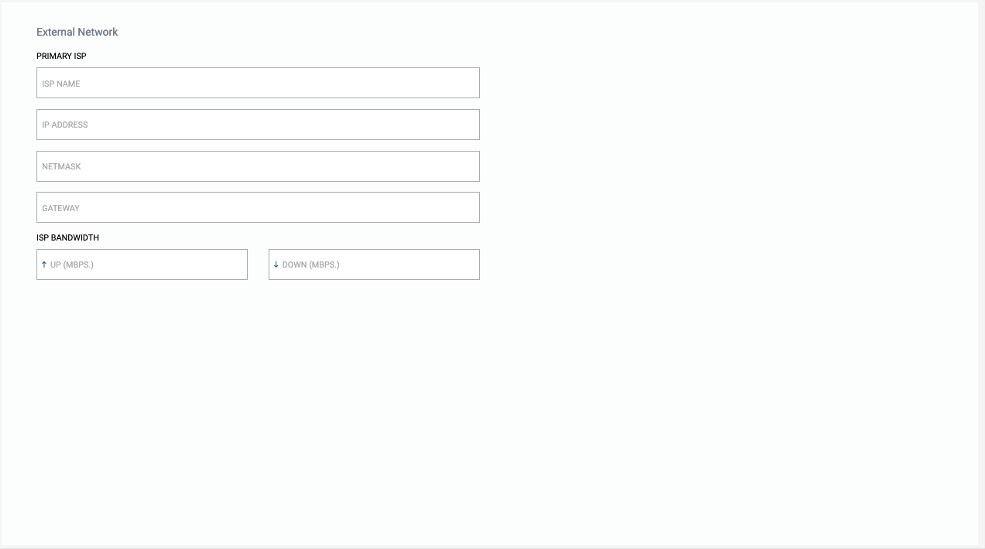
External Network
Provide information about one or two ISPs depending on your choice of Edge Deployment Scenario.
Specify the details about the Internet Service Provider you have at this Site for external connectivity.
- The Untrusted IP Address should be your external IP address, netmask, gateway and bandwidth up and down at the Site
- The address that G-Net can use to reach your Site.
Internal Network
G-Net supports two Routing Policies,
- The “Routed” site option provides the ability to have multiple networks (VLANs) at a single site where you are managing explicit local security policies outside of the G-Net FWaaS service. Our device does not route traffic, we need to be aware of the subnets and the address of the internal router to reach them
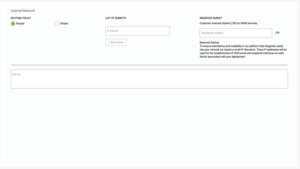
- Provide a list of Subnets – List all Subnets that exist at this Site.
- Reserve Subnet – Customer reserved Subnet (/24) for G-Net services
- The “Simple” site option is for single subnet networks that don’t need explicit local security policies. In this case the G-Net edge appliance can provide DHCP to your local subnet.
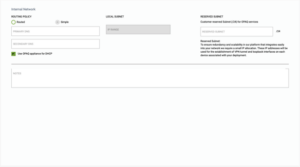
- Provide Primary DNS
- Provide Secondary DNS
- Reserve Subnet – Customer reserved Subnet (/24) for G-Net services
- Optional to Use G-Net appliance for DHCP
- Hit “Save”
Host Groups
To allow access among systems, you may define groups of computer hosts as Host Groups. A Host Group is defined as a group of related IP addresses, subnets or IP address ranges. Host Groups are used for defining policies under the Policy tab.
- To Add a Host Group, click the +Add Site button
- To Delete a Host Group, click on Delete button
- To Edit a current Host Group, click the Edit button.
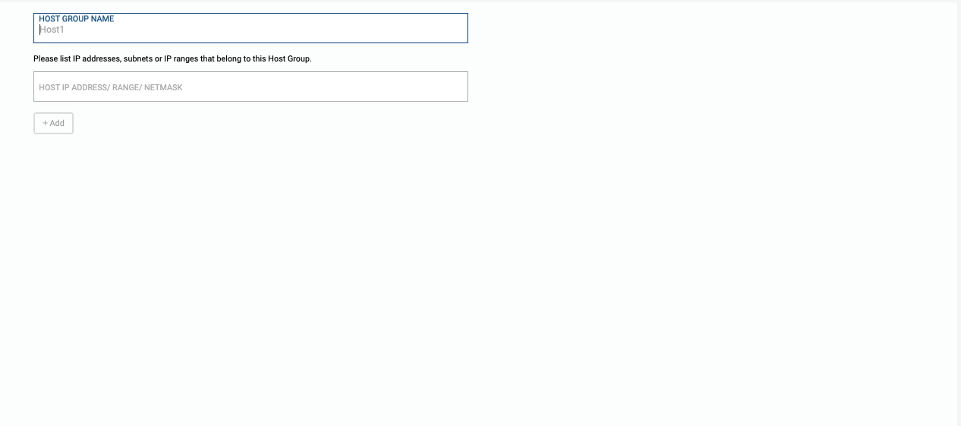
- HOST GROUP NAME
- HOST IP ADDRESS/RANGE/NETMASK
- Please list IP addresses, subnets or IP ranges that belong to this Host Group
HIT “Add Host Group”
Directory Services
AD integration allows G-Net to associate your network traffic with users in your customers organization and enables policies to be defined based on users and user groups. 
At this time G-Net supports Microsoft Active Directory or “Azure AD”. Other LDAP solutions will be added at a later time.
- Specify Azure Application and Directory ID if Azure AD subtype selected.
- Name for your AD with at least three characters.
- Base DN: example “DC=corp,DC=opaq,DC=com”
- If not sure perform a DSQUERY
- Bind DN: example “CN=user1,CN=users, DC=corp,DC=opaq,DC=com”
- If not sure perform a DSQUERY
- Select whether your AD requires a SSL/TLS based secure connection.
- Specify the IP address of your AD Server and the port number.
- If you have multiple AD Servers, please list them all here.
- Provide a service username and password to connect to your AD that will be able to retrieve data from it.
HIT “Add Directory Service”
Policies
Policies should be well thought-out to minimize potential risk. Deny-All-Permit-Explicitly (DAPE).
Now that HOST GROUPS are defined, you can define security policies
There are three types of POLICIES that you can be create within the G-Net Cloud Console
Inbound – By default, all servers are inaccessible from networks outside your organization. Policies can be added here to allow servers to be accessed from external networks.
Internal – By default, Host Groups at different sites cannot access each other. Policies can be added here to provide controlled site to site access between Host Groups.
Outbound – With this security posture view Host Groups are blocked to internet and external serves by default. This access is filtered through the security controls turned on. Policies can be added to allow further access.
Inbound
By default, all servers are inaccessible from networks outside your organization. Policies can be added here to allow servers to be accessed from external networks.
SPECIFIC ALLOW
DEFAULT DENY
The Server will be accessible from anywhere on the Internet if no IP Addresses, IP Ranges or Netmasks are added.
Select the Server(s) you need to allow access to from the Internet or another external network.
If this policy should apply to all Servers within your solution, including what you may add in future, select check-box “All Internet Facing Servers” instead.
- To Add Inbound Policies, click the +Add Site button
- To Delete Inbound Policies, click on Delete button
- To Edit a current Inbound Policy, click the Edit button.
- To Disable/Enable a current Inbound Policy, click the Disable/Enable button.
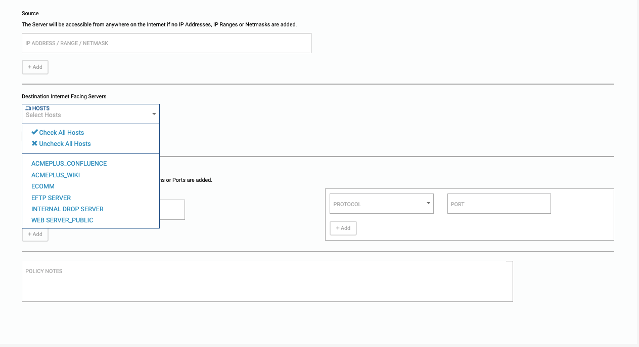
- Source – The Server will be accessible from anywhere on the Internet if no IP Addresses, IP Ranges or Netmasks are added.
- Destination Internet Facing Servers – Select Hosts from the drop-down or
- Check the box for “All Internet Facing Servers”
- List all Applications and Ports for which selected Server(s) should be accessible to the IP addresses specified above.
- NOTE: If no Applications, Port, or Port Range are added, this policy will apply to “Any” (or all) Applications and Ports.
Hit Add “Inbound Policy”

Internal
By default, Host Groups at different sites cannot access each other. Policies can be added here to provide controlled site to site access between Host Groups.
SPECIFIC ALLOW
DEFAULT DENY: SITE-TO-SITE
Policies can be added here to control cross-site access between Host Groups at each site
Select the source Host Groups, Users, and User groups you would like to provide connectivity from.
- To Add Internal Policies, click the +Add Site button
- To Delete Internal Policies, click on Delete button
- To Edit a current Internal Policy, click the Edit button.
- To Disable/Enable a current Internal Policy, click the Disable/Enable button.
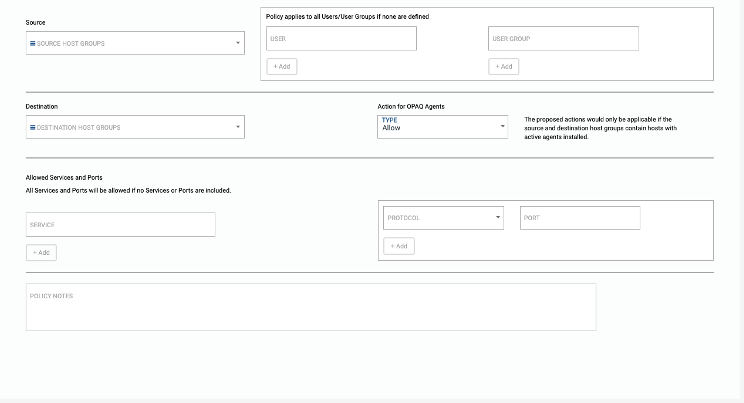
- Source – Select Host Group from the drop-down
- Destination- Select Destination Host Group from the drop-down
- Services – List all Applications and Ports for which selected Server(s) should be accessible to the IP addresses specified above.
- NOTE: If no Applications, Port, or Port Range are added, this policy will apply to “Any” (or all) Applications and Ports.
- Specify the Host Groups, Users or User Groups who should have access to the destination Host Group selected above
Hit Add “Internal Policy”

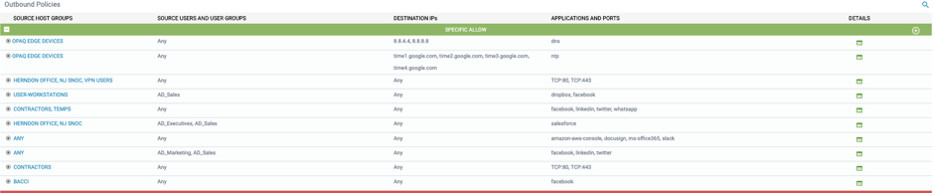
Outbound
With this security posture view Host Groups are blocked to internet and external serves by default. This access is filtered through the security controls turned on. Policies can be added to allow further access.
SPECIFIC ALLOW
DEFAULT DENY
Policies can be added here to control cross-site access between Host Groups at each site
Select the source Host Groups, Users, and User groups you would like to provide connectivity from.
- To Add Outbound Policies, click the +Add Site button
- To Delete Outbound Policies, click on Delete button
- To Edit a current Outbound Policy, click the Edit button.
- To Disable/Enable a current Outbound Policy, click the Disable/Enable button.
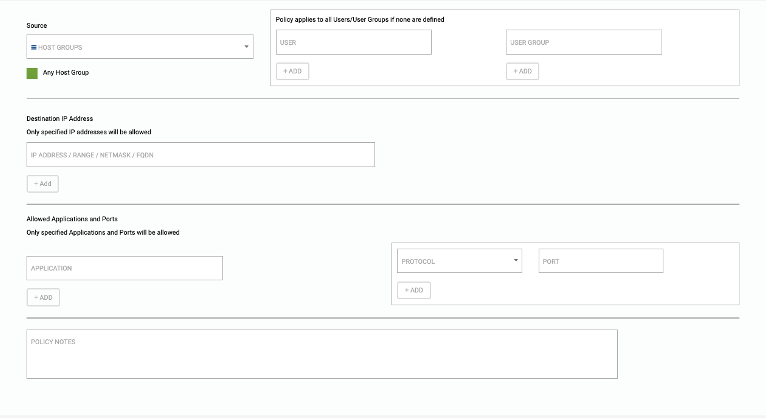
- Source – Select Host Group from the drop-down
- Check the box for “Any Host Group”
Destination IP Address – List all external IP addresses, netmasks or IP address ranges that are specifically allowed accessibility via this policy.
- Services – List all Applications and Ports for which selected Server(s) should be accessible to the IP addresses specified above.
- NOTE: If no Applications, Port, or Port Range are added, this policy will apply to “Any” (or all) Applications and Ports.
- Specify the Host Groups, Users or User Groups who should have access to the destination Host Group selected above
Hit Add “Outbound Policy”
6. Security Controls
Security Controls
The Security Control tab details the advanced Security features available in the G-Net FWaaS service offering.
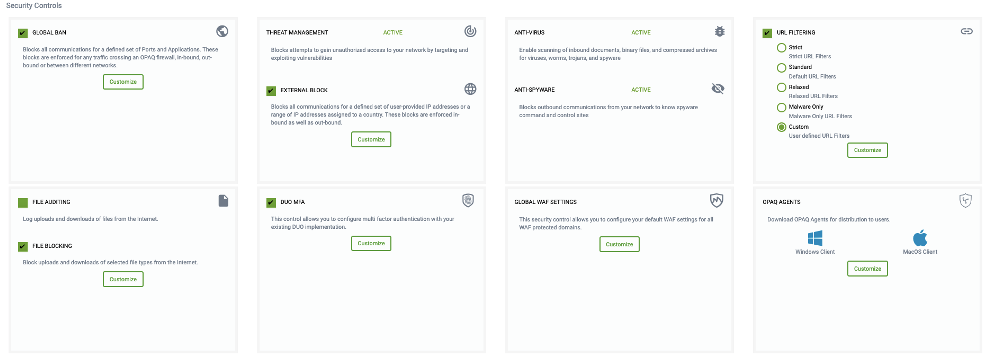
- Threat Management -Blocks attempts to gain unauthorized access to your network by targeting and exploiting vulnerabilities
- Anti-Virus – Enables scanning of inbound documents, binary files, and compressed archives for viruses, worms, trojans, and spyware.
- Anti-Spyware – Blocks outbound communications from your network to know spyware command and control sites.
- File Auditing can be enabled via selecting a check box – Log uploads and downloads of files from the Internet.
Below are the configurable Security Controls;
Global Ban
Blocks all communications for a defined set of Ports and Applications. These blocks are enforced for any traffic crossing an G-Net FWaaS firewall, in-bound, out-bound or between different networks.
G-Net FWaaS blocks a set of applications that are added as best practice at the time of initial setup. You may remove these as needed or add more applications / ports to this list.
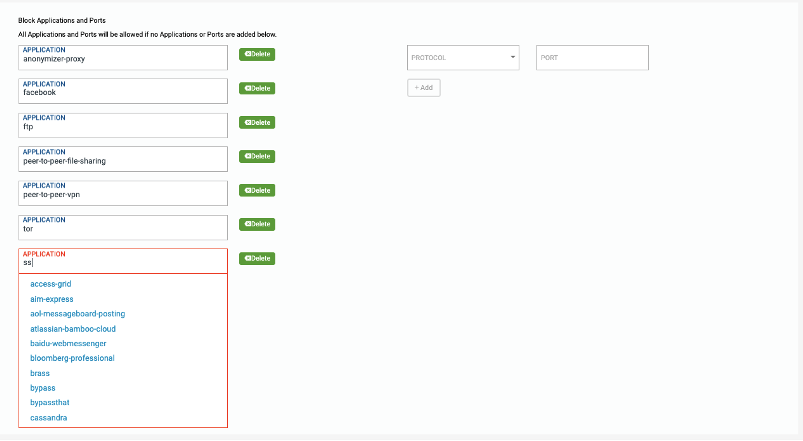
Specify the applications / ports that should be blocked. Policies will be added to block these applications / ports for incoming traffic, internal traffic as well as outgoing traffic.
- To Add Application, click the +Add Site button at the bottom of the screen
- To Delete Application, click on Delete button
Hit Save
File Blocking
Block uploads and downloads of selected file types from the Internet.
Specify the file types that need to be block. For example: “exe” (executable files), from being uploaded/downloaded.
Click on “Customize”
- To Add File Block, Allowed Application and Domain Exception, click the +Add Site button at the bottom of the screen
- To Delete File Block, Allowed Application and Domain Exception, click on Delete button
- Allowed Application – Specify Applications exceptions to File Block.
- For example: while blocking exe files, you can allow Applications “ms-updates” and “adobe-updates” to allow their “exe” files for update
- Domain Exception – Specify domains for which the File Block should not apply.
- For example, if you allow any downloads from www.apple.com, you can list it here.
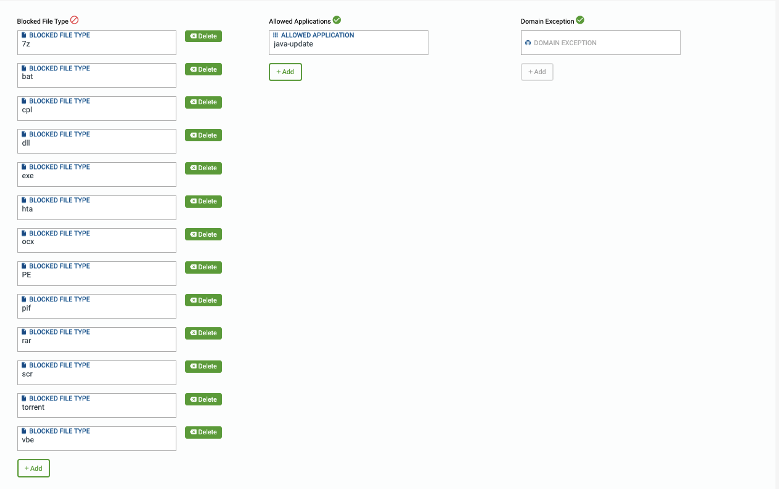
Hit Save
URL Filtering
Based on the level of URL Filtering you selected on the Security Controls page, G-net has recommended a list of URL Categories to be blocked for your network. 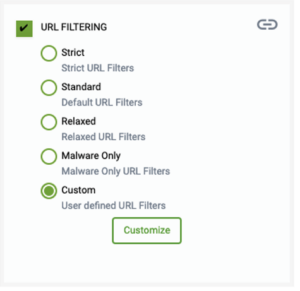
- Select URL Filtering preset categories by selecting the radio button
- Select “Customize”- Adjust these categories by either selecting a different level of URL filter from the “Security Controls”, or by moving Categories between Allowed and Blocked lists here.
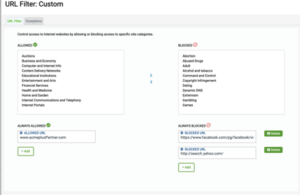
- Specify any URL domains that must always be allowed or always be blocked across network. Use wildcard character * to indicate all subdomains for a large domain, for example *.domain.com.
If you have special need to allow or block some URL categories or URLs for a specific set of users or systems, define “URL Filter Exceptions” by clicking on “Exceptions” tab.
For each Exception, specify URL Categories or URLs that need to be allowed or blocked to specified set of Host Groups, Users or User Groups.
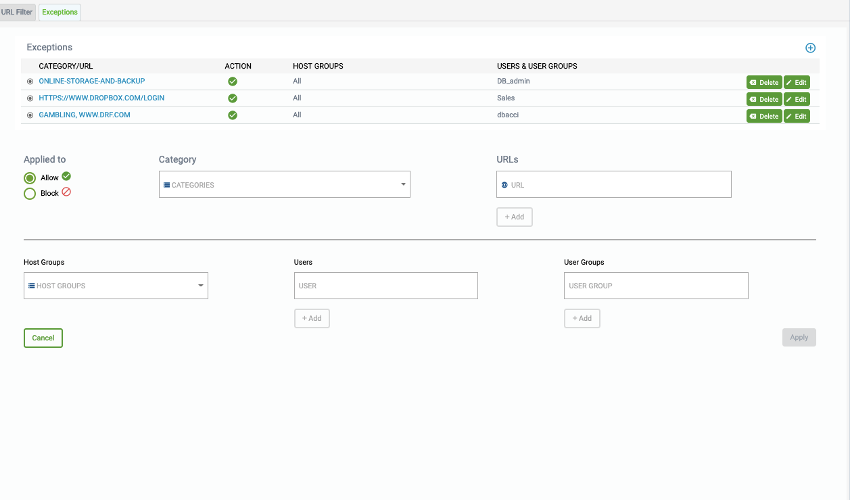
- To Add Exception, click the +Add Site button
- To Delete Exception, click on Delete button
- To Edit a current Exception, click the Edit button.
Hit Save
G-Net VPN Agents
To provision for VPN access Click on “Customize” then enable “VPN” connectivity by selecting the “VPN” check box. 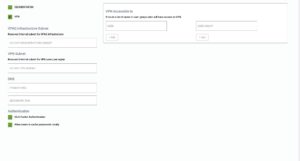
For setting up of VPN and/or Segmentation solution, G-Net needs a /24 subnet in RFC1918 address space. Please provide an unused subnet for this.
Select the individual users and / or user groups you want to provide access to via the VPN
If you would like to use internal DNS servers, you may enter the primary and secondary IP addresses in the labeled fields.
If no DNS servers are specified OPAQ will default to using the Google primary and secondary DNS servers located at IP addresses 8.8.8.8 and 8.8.4.4
Select “Multi Factor Authentication” if you would like to utilize DUO based Multi Factor Authentication with the VPN client. You should provide your DUO account information separately within the Security Controls.
Select “Allow users to cache passwords locally” if you wish to do so.
Hit Save
DUO MFA
This control allows you to configure multi factor authentication with your existing DUO implementation
To enable click on the check box for DUO MFA
Once enable Select “Customize”-
DUO Multi factor authentication provides another level of access control by requiring the user to provide something they know (user name & password) with something they have (Email account, Mobile phone) in order to gain access to a network or system.
Please select where you would like to enforce multi factor authentication.
- Select Portal Access
- Select VPN
For DUO integration copy / paste

- Integration key
- Secret key
- API hostname
Hit Save
7. Activation Request
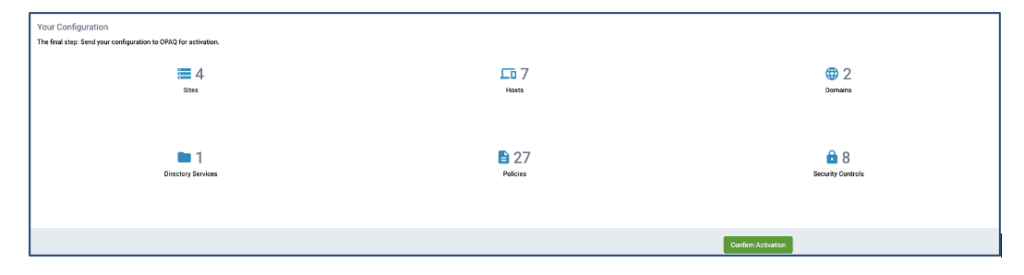
Activation Request
This is the final step prior to sending your configuration to G-Net for activation. This tab allows you to review your configuration. You will see red if there were any fields missing or has invalid data. Once reviewed and verified to be correct, click ‘Confirm Activation’ and the G-Net Support Team will implement your Activation Request.
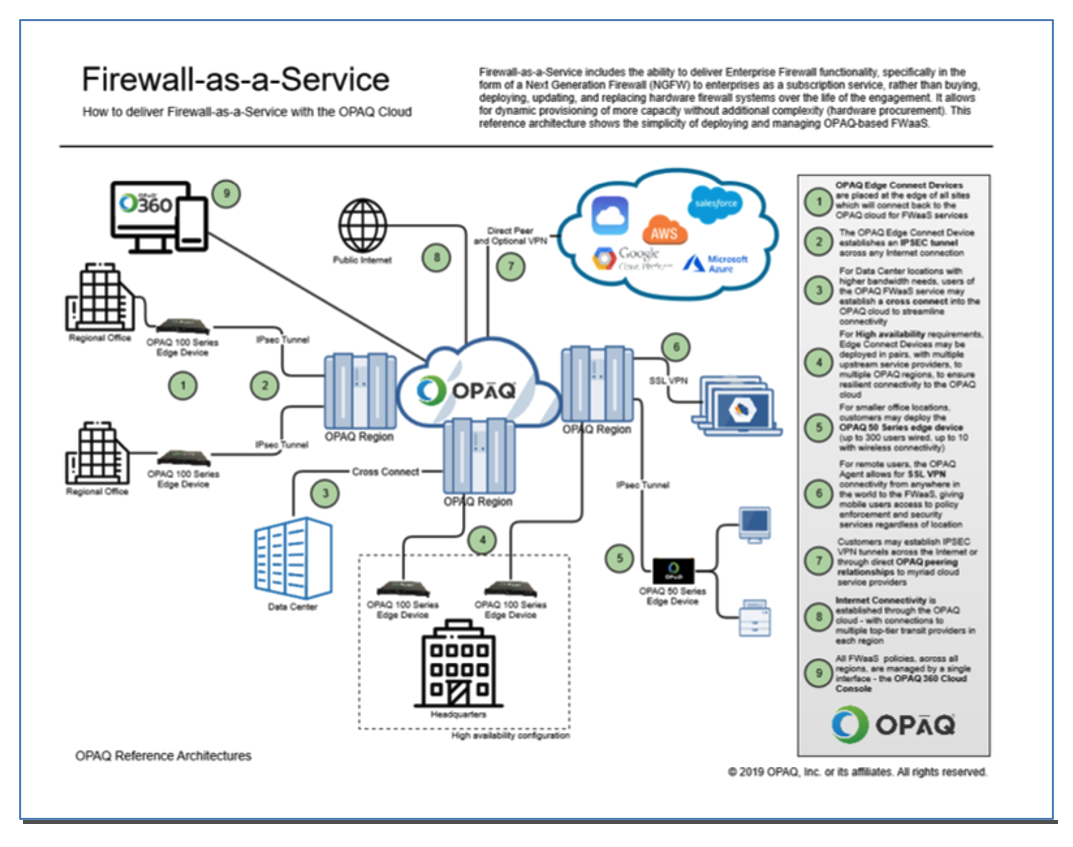
8. Firewall-as-a-Service Reference Architecture
4. Server Settings
Nam liber tempor cum soluta nobis eleifend option congue nihil imperdiet doming id quod mazim placerat facer possim assum. Typi non habent claritatem insitam; est usus legentis in iis qui facit eorum claritatem. Investigationes demonstraverunt lectores legere me lius quod ii legunt saepius. Claritas est etiam processus dynamicus, qui sequitur mutationem consuetudium lectorum.
Mirum est notare quam littera gothica, quam nunc putamus parum claram, anteposuerit litterarum formas humanitatis per seacula quarta decima et quinta decima. Eodem modo typi, qui nunc nobis videntur parum clari, fiant sollemnes in futurum.
Web Hooks
Lorem ipsum dolor sit amet, consectetuer adipiscing
1. Introduction
2. Get Started
Nam liber tempor cum soluta nobis eleifend option congue nihil imperdiet doming id quod mazim placerat facer possim assum. Typi non habent claritatem insitam; est usus legentis in iis qui facit eorum claritatem. Investigationes demonstraverunt lectores legere me lius quod ii legunt saepius. Claritas est etiam processus dynamicus, qui sequitur mutationem consuetudium lectorum.
Mirum est notare quam littera gothica, quam nunc putamus parum claram, anteposuerit litterarum formas humanitatis per seacula quarta decima et quinta decima. Eodem modo typi, qui nunc nobis videntur parum clari, fiant sollemnes in futurum.
Connect Platforms
Lorem ipsum dolor sit amet, consectetuer adipiscing
1. Introduction
2. Installation
3. Server Settings
Nam liber tempor cum soluta nobis eleifend option congue nihil imperdiet doming id quod mazim placerat facer possim assum. Typi non habent claritatem insitam; est usus legentis in iis qui facit eorum claritatem. Investigationes demonstraverunt lectores legere me lius quod ii legunt saepius. Claritas est etiam processus dynamicus, qui sequitur mutationem consuetudium lectorum.
Mirum est notare quam littera gothica, quam nunc putamus parum claram, anteposuerit litterarum formas humanitatis per seacula quarta decima et quinta decima. Eodem modo typi, qui nunc nobis videntur parum clari, fiant sollemnes in futurum.
Request a Feature or Open a Ticket
Send us a ticket and we will get back to you.